Data Validation Tools and Tips in Excel

Excel’s data validation tools are a simple yet powerful way to keep your data accurate and error-free. With data validation in Excel, you can set rules that control what you can enter into a cell, helping you maintain consistency and avoid mistakes before they happen.
Think about those times when someone accidentally types text into a number field or enters a date in the wrong format. Annoying, isn’t it? By using at least one Excel data validation tool, you can prevent these issues massively. Creating drop-down lists or requiring a date to follow a specific format are only a few examples of data validation tools in Excel.
Whether you’re working with small lists or large datasets, our data validation tips in Excel can help you keep your spreadsheets clean, organized, and accurate.
P.S. In mid-way of this article, you can try generating Excel Formulas with AI for free! You can say thanks later.
How To Set Up Data Validation in Excel?
Good old Excel has several benefits. One of the researches from the 12th International Conference on Information and Education Technology 2024 stated that Excel is a highly trusted and user-friendly tool for data visualization, offering an intuitive interface, visually appealing graphics, and strong functionality that make it a preferred choice for students and professionals alike.
No wonder why it’s still so popular. One of Excel’s must-use tools nobody should forget though is the data validation option.
How to Set Up Data Validation in Excel
Time needed: 2 minutes
To set up validation for a cell or range of cells, follow these steps:
- Select the data
Select the cell or range of cells to which you want to apply this rule.
- Activate the Data Validation window
In the “Data” tab of the ribbon, click the “Data Validation” button.

- Set up data validation settings
In the “Data Validation” window, choose the type of validation that you want to set up. You can choose from a variety of options, such as “Whole Number,” “Decimal,” “Date,” or “List.”
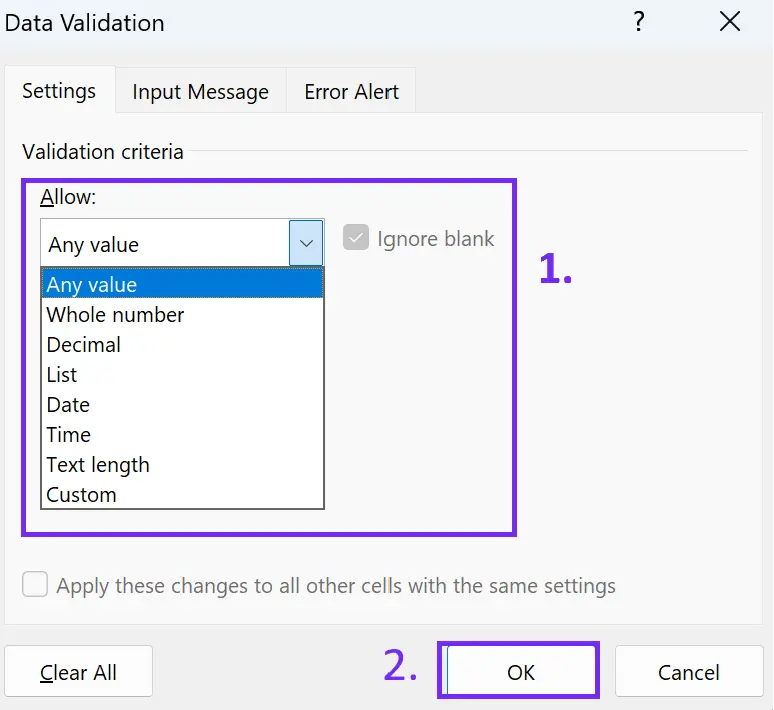
- Additional settings
Set any additional options for this rule. For example, if you choose the “Whole Number” option, you can specify a minimum and maximum value for the cell.
- Save
Click “OK” to apply the rule to the selected cells.
Once you have set up validation for a cell or range of cells, Excel will enforce your defined constraints. If a user tries to enter data that does not meet the constraints, they will see an error message and will be unable to enter the invalid data.
You might be interested: How to create digital dashboards?
Excel Data Validation Tools: Drop-down Lists
Excel’s data validation tools offer a powerful feature: the ability to create a drop-down list within a cell. This is especially useful when you need to restrict input to a predefined set of options, ensuring consistency and reducing errors.
How to Create a Drop-down List in Excel?
Follow these steps:
- Select the cell or range of cells to which you want to apply the drop-down list.
- In the “Data” tab of the ribbon, click the “Data Validation” button.
- In the “Data Validation” window, choose the “List” option.
- In the “Source” field, enter the list of options that you want to include in the drop-down list. You can either type the list manually or you can select a range of cells that contain the list.
- Click “OK” to apply the rule to the selected cells.
For more in-depth reading: Check our guide that explains how to create not only basic but also dynamic drop-down lists in Excel.
For those who prefer videos, here’s a short video guide:
Once you have set up a drop-down list for a cell, you can select a value from the list when you enter data into the cell. This can be an incredible help in preventing errors since you will only be able to choose from the pre-defined list of options.
Reporting gives you a headache?
Upload your data and create professional reports with agentic AI

Start free
Try free and upgrade whenever
Excel Data Validation Tools: Formula-based Rules
In addition to the built-in validation options in Excel, you can also use formulas to set up more complex rules. For example, you might want to set up a rule that allows a cell to contain a value only if it meets certain criteria.
How to Set Up a Formula-based Excel Validation Rule?
Follow these steps:
- Select the cell or range of cells to which you want to apply the validation rule.
- In the “Data” tab of the ribbon, click the “Data Validation” button.
- In the “Data Validation” window, choose the “Custom” option.
- In the “Formula” field, enter the formula that you want to use for the validation rule. The formula should return either “TRUE” if the data is valid or “FALSE” if the data is invalid.
- Click “OK” to apply the rule to the selected cells.
Using formulas for validation allows you to create very specific and customized rules for your data. For example, you might use a formula to ensure that a cell contains a number that is divisible by 10, or that a cell contains a date that falls within a certain range.
Generate Excel Formula with AI
In case formulas scare you, our Excel Formula Generator can do all the work. Check it in action:
We have more AI efficiency tools. Khem…more than 17. Feel free to check them out!
Excel Data Validation Tips
Using Excel data validation tools is great, but we want to give you some data validation tips, too. Why? So, you can maximize your efficiency and just learn more about the good old Excel.

1. Be Aware of the Limitations
Data validation can help you prevent errors, but unfortunately, it’s not foolproof. Users can still bypass restrictions by copying and pasting data or using external scripts.
In case you feel confused with all the Excel data, consider setting up the Ajelix Excel Add-In. This Add–In can solve difficult tasks, generate and explain complex formulas, and translate spreadsheets in 28 languages.
2. Apply Input Messages & Error Alerts
Use input messages to guide users on what to enter, and customize error alerts to provide clear feedback when invalid data is entered.
In case your spreadsheets have errors, you can easily fix them using AI. Check the video below: 👇
3. Use Formulas for Dynamic Validation
Excel Data Validation Tools are powerful with formulas. Consider setting up custom formula-based validation to create rules based on other cell values, ensuring real-time data accuracy.
4. Protect Your Worksheet
Perhaps this tip sounds very basic, but it’s one of the most important Excel data validation tips we can give you. Focus on combining data validation with sheet protection to prevent users from modifying or bypassing validation settings.
5. Regularly Audit and Test
Periodically review your validation rules to ensure they still meet your needs, especially when working with evolving datasets. Everything changes fast in this world, so keep your Excel Spreadsheet up-to-date.
Conclusion
In summary, Excel’s data validation tools are very useful for making sure you don’t commit errors and can have accurate data. Simple as that.
Remember our data validation tips and mentioned examples of data validation tools because this will lead you to reliable and trustworthy spreadsheets that are easier to work with and analyze.
If you’re struggling with Excel and its countless formulas, you will find our AI Efficiency Tools and the Formula Cheat Sheet very useful.
We have many more Excel and Google Sheets hacks in our other articles!
Wish to stay in the research and tips & tricks loop? Sure, let’s stay connected.
FAQ
Data validation in Excel is a feature that allows you to set rules for what can be entered into a cell. It helps prevent errors by restricting input to specific formats, ranges, or predefined lists.
Common data validation rules include restricting input to whole numbers, setting minimum and maximum values, enforcing specific date formats, and using formula-based validation for custom rules.
To create a drop-down list, go to the “Data” tab, click “Data Validation,” select “List,” and enter or select the options you want users to choose from.
Yes, while data validation helps prevent errors, it is not foolproof. Users can still bypass restrictions by copying and pasting data or using external scripts.
To maximize effectiveness, use input messages and error alerts, protect your worksheet from unwanted modifications, and regularly audit your validation rules to ensure they remain relevant.
Speed up your spreadsheet tasks with Ajelix AI in Excel