Project is your central workspace in Ajelix where you organize related work, files, and conversations. Think of it as a container that holds everything related to a specific goal, client, or workflow.
Table of contents:
- Creating a New Project
- Best Project Creation Practices
3.1 Naming Your Project
3.2 Writing a Useful Description
3.3 Deleting projects - Managing Existing Projects
4.1 Editing Project Details
4.2 Switching Between Projects - Working with Files and Conversations
5.1 Project Files
5.2 Project Conversations - Quick Reference: Project Actions
Creating a New Project
Getting started with a new project in Ajelix takes just a few clicks. Here’s the actual process and what you should know about setting up projects that are organized and ready for work.
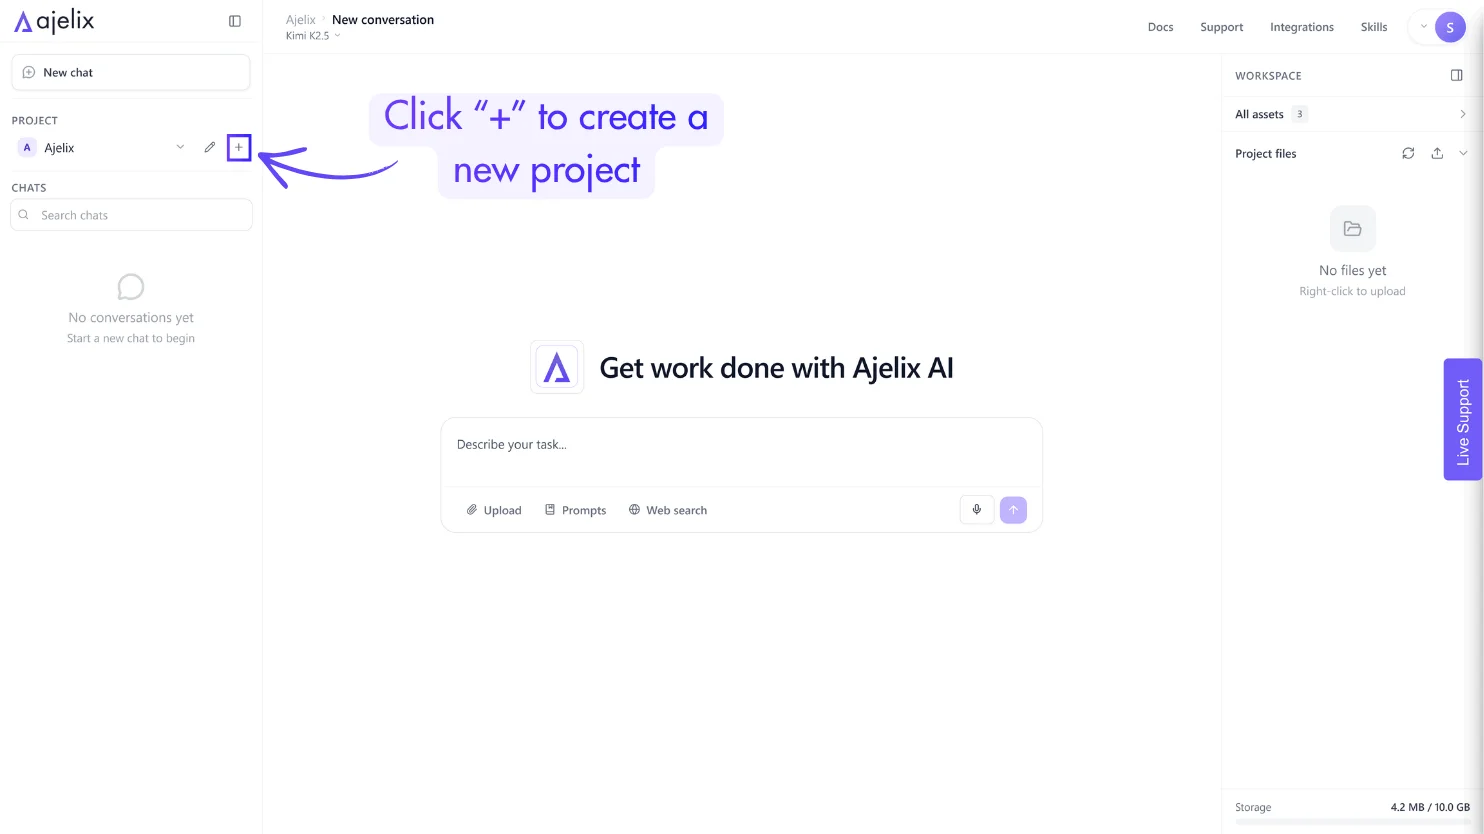
1. Click the “+” button in the left navigation bar under “Project” section
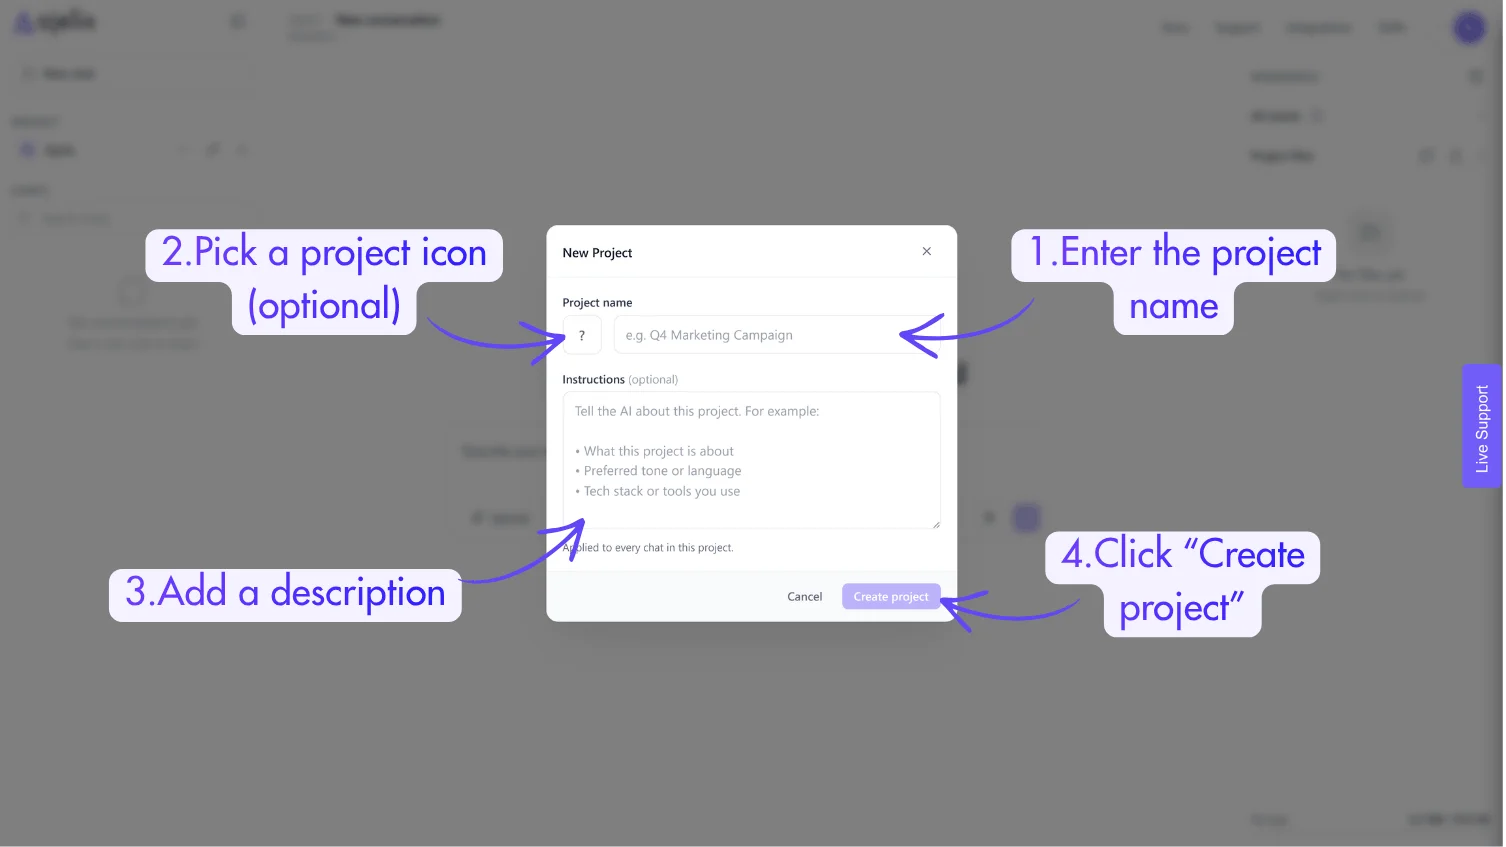
2. Enter a Project Name -This should be descriptive enough that you’ll recognize it weeks or months later
3. Add a Description (optional but recommended) – Note the goal, deadline, client name, or any context that helps you remember why you created this project
4. Click Create Project
Your new project opens immediately, and you’re ready to start working.
Best Project Creation Practices
1. Naming Your Project
A good project name makes it easy to find your work later. Consider these naming strategies:
For client work:
- ClientXYZ_WebsiteRedesign
- SmithConsulting_FinancialAnalysis_2026
- AcmeCorp_Q4MarketingPlan
For internal projects:
- Q4_SalesReview
- ProductLaunch_Budget
- TeamTraining_Materials
For personal work:
- Blog_ContentCalendar_January
- HomeRenovation_Budget
- TaxDocuments_2026
Avoid vague names like:
- Project 1
- New Project
- Stuff
- Test
These names become meaningless when you have dozens of projects.
2. Writing a Useful Description
The description field is easy to skip, but it’s valuable for AI context. The AI can see your project description, which helps it understand the broader context of your work and provide more relevant assistance. This is the place where you can define specific guides that will apply to all projects, like writing guides, brand colors, tone, context about you or your company, anything AI should know every time it replies to you.
Good description examples:
“Financial analysis for Client XYZ’s Q3 performance. Due by October 15. Focus on revenue trends and expense reduction opportunities.”
“Blog content calendar and draft articles for January 2024. Target: 8 posts on productivity and remote work topics.”
“Personal budget tracker and expense analysis. Comparing 2023 spending patterns to plan 2024 savings goals.”
When the AI knows your project’s purpose from the description, it can better tailor its responses. For example, if your description mentions “research paper,” the AI adjusts its tone and formatting accordingly.
3. Deleting projects
When a project is complete or no longer active, you can delete it, which:
- Permanently removes all files and conversations
- Cannot be undone
- Use for: test projects or work you’re certain you don’t need
To delete a project:
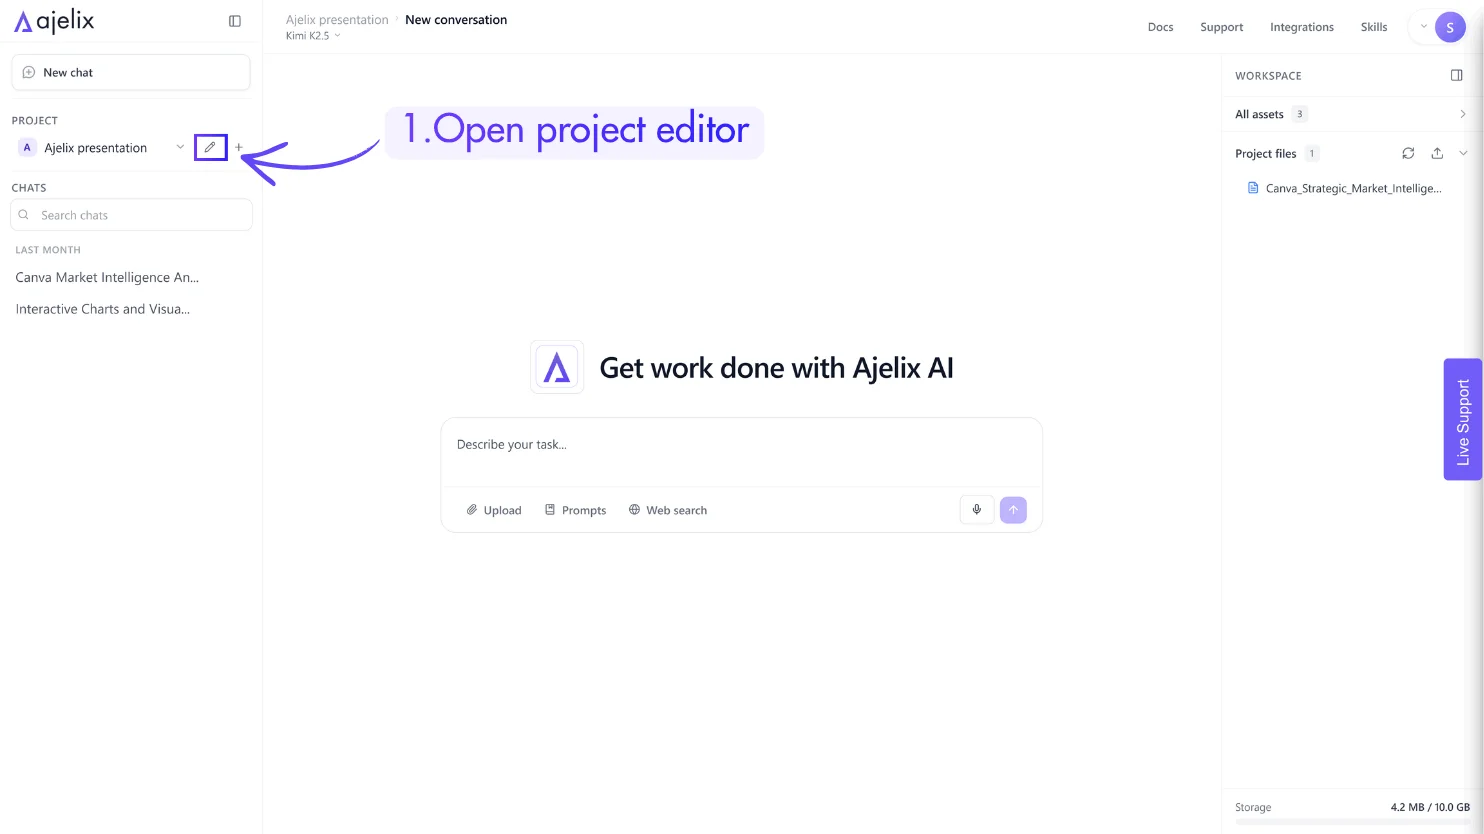
1. Open project editor
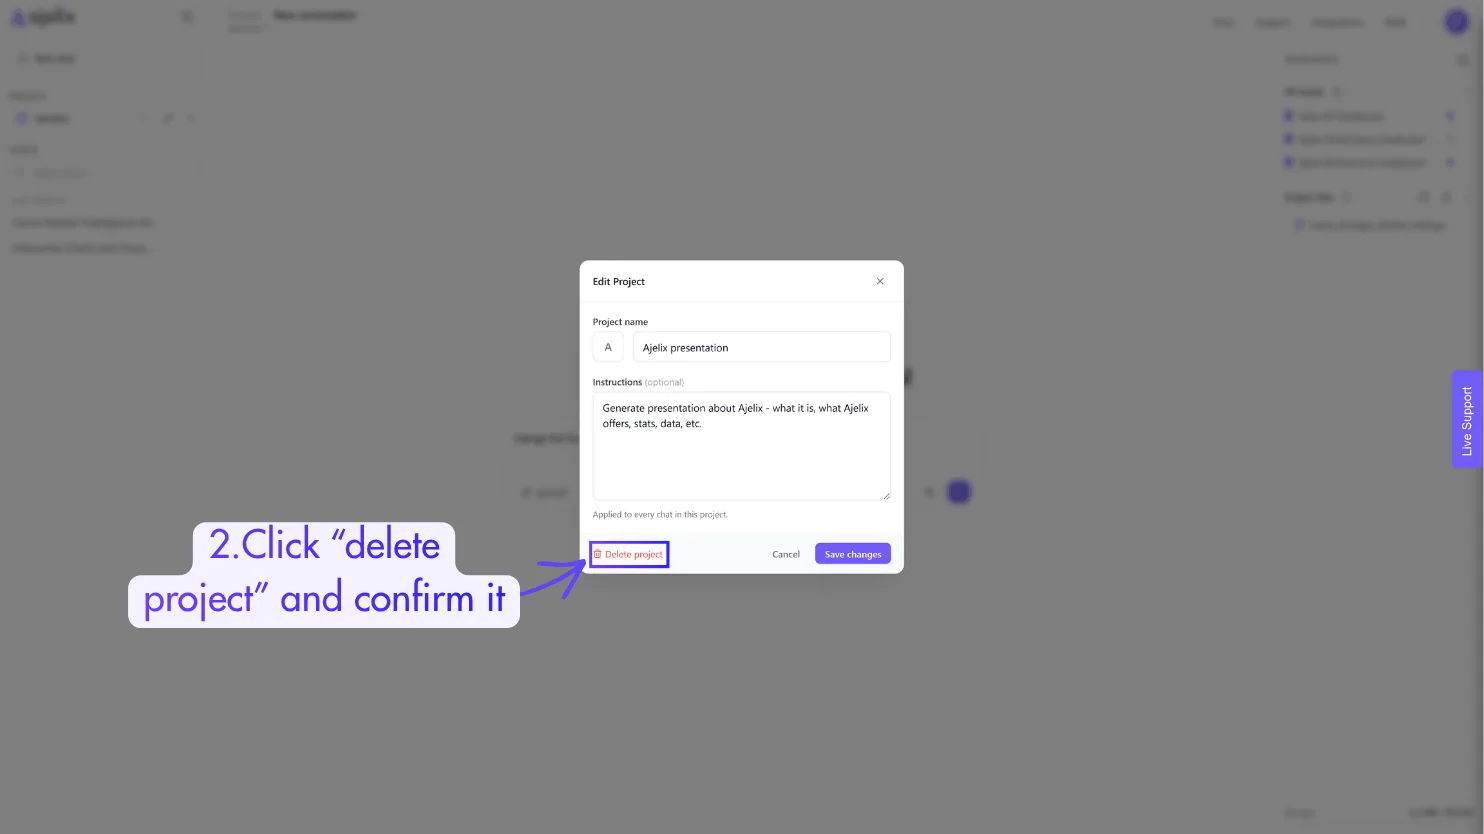
2. Select Delete
3. Confirm your choice
Managing Existing Projects
After creating a project, you’ll often need to update details, switch between active work, or reorganize as priorities shift. Ajelix makes project management straightforward.
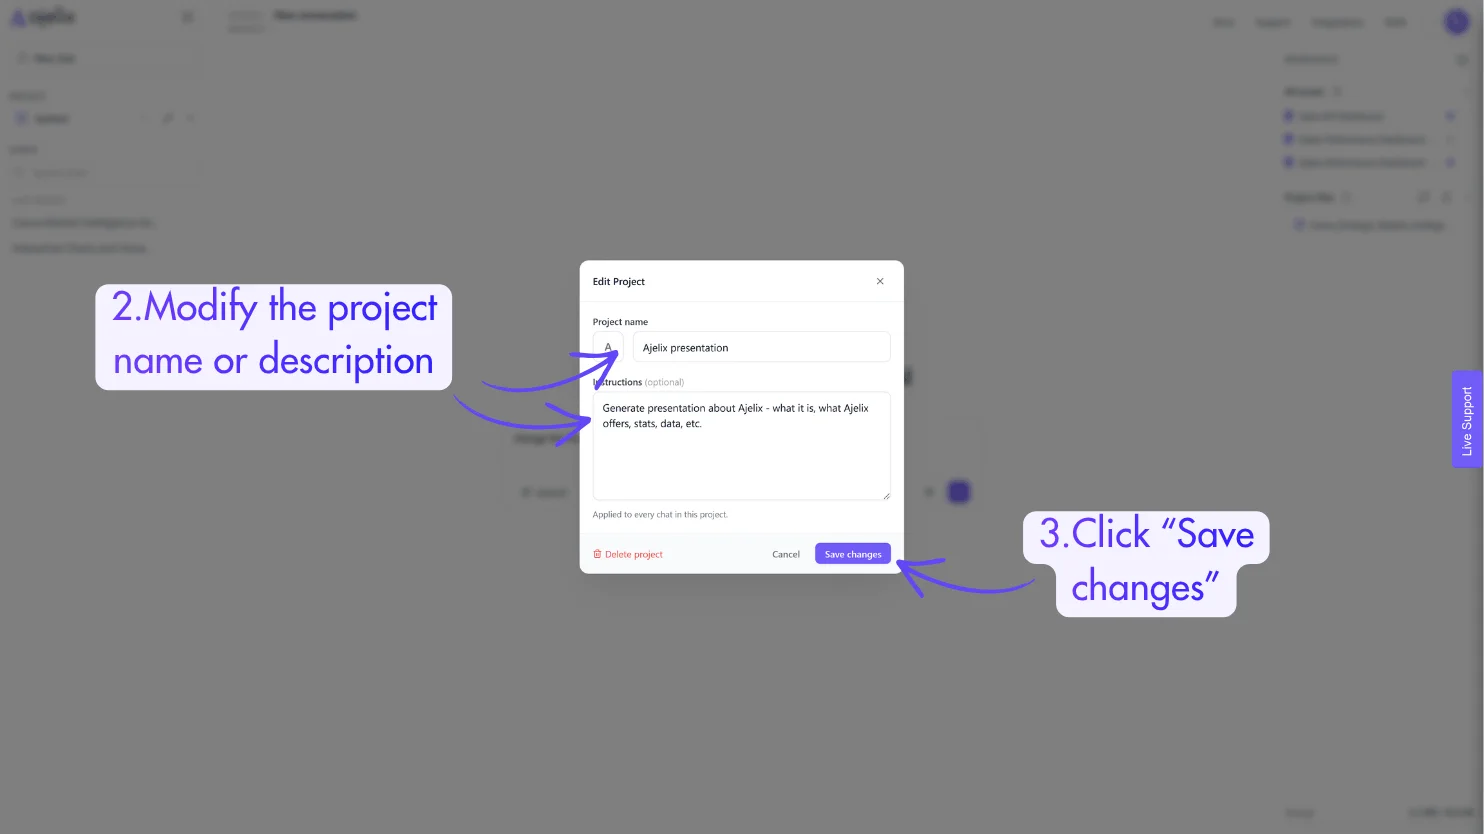
1. Editing Project Details
Project names and descriptions aren’t set in stone. Update them as work evolves:
1. Choose the project you would like to edit
2. Select pen icon to edit your project
3. Modify the name or description
4. Click Save Changes
2. Switching Between Projects
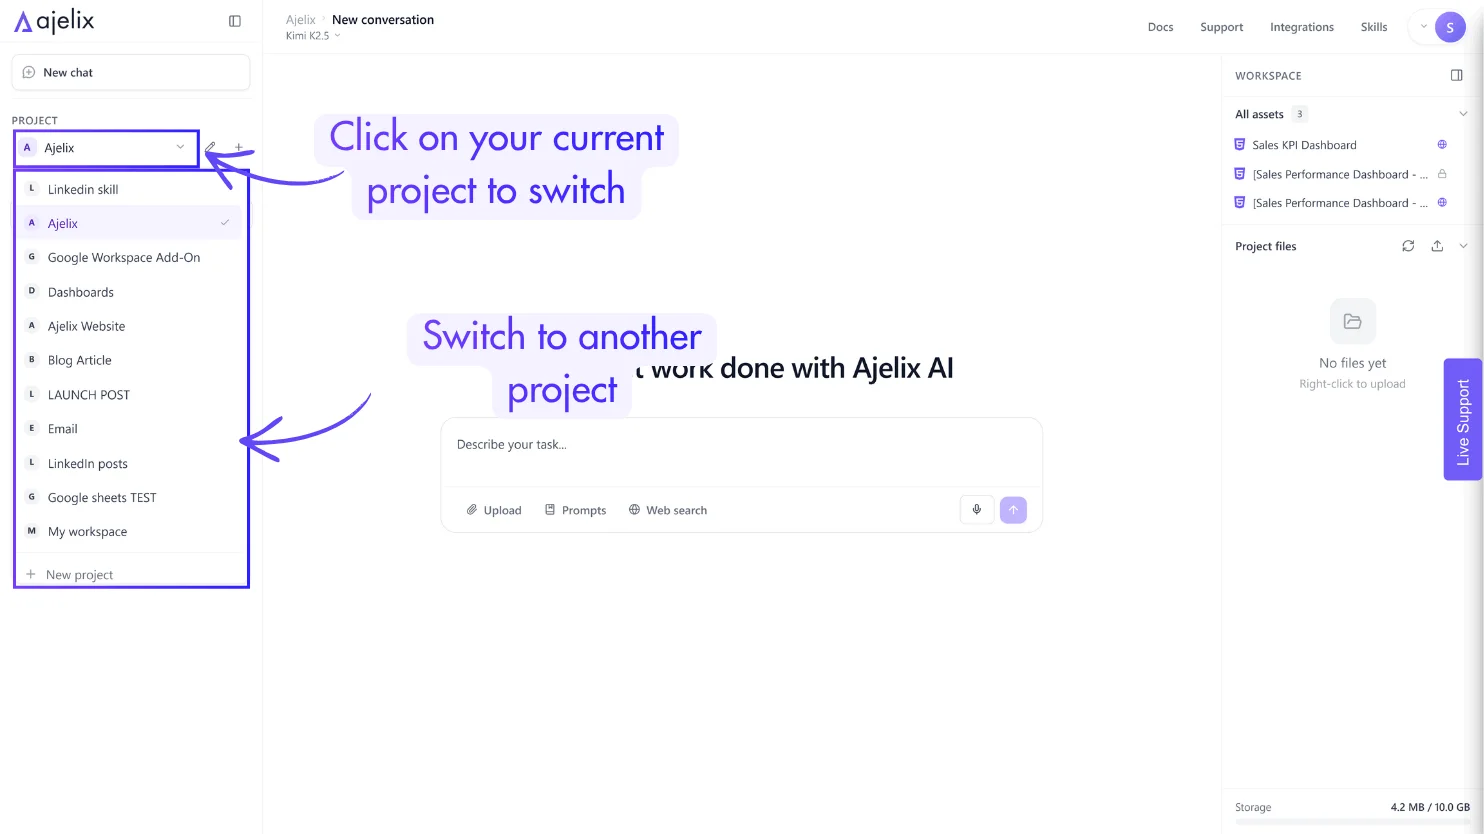
Active users often work across multiple projects simultaneously. Navigate efficiently:
- Click any project name in the left sidebar to switch instantly
- Your previous conversations and file positions are preserved when you return
Pro tip: Keep your active project count manageable. If you have more than 10 active projects, consider deleting completed work.
Working with Files and Conversations
Project Files
Upload, create, and organize files directly within your project:
- Supported formats:
.xlsx,.csv,.pdf,.docx,.txt,.json, and more - Files are visible in the Project files panel under the project name
- Click any file to open it in the appropriate viewer or editor
File management tips:
- Use subfolders for complex projects (create them in the Files panel)
- Delete temporary or test files regularly to reduce clutter
How to upload and manage files?
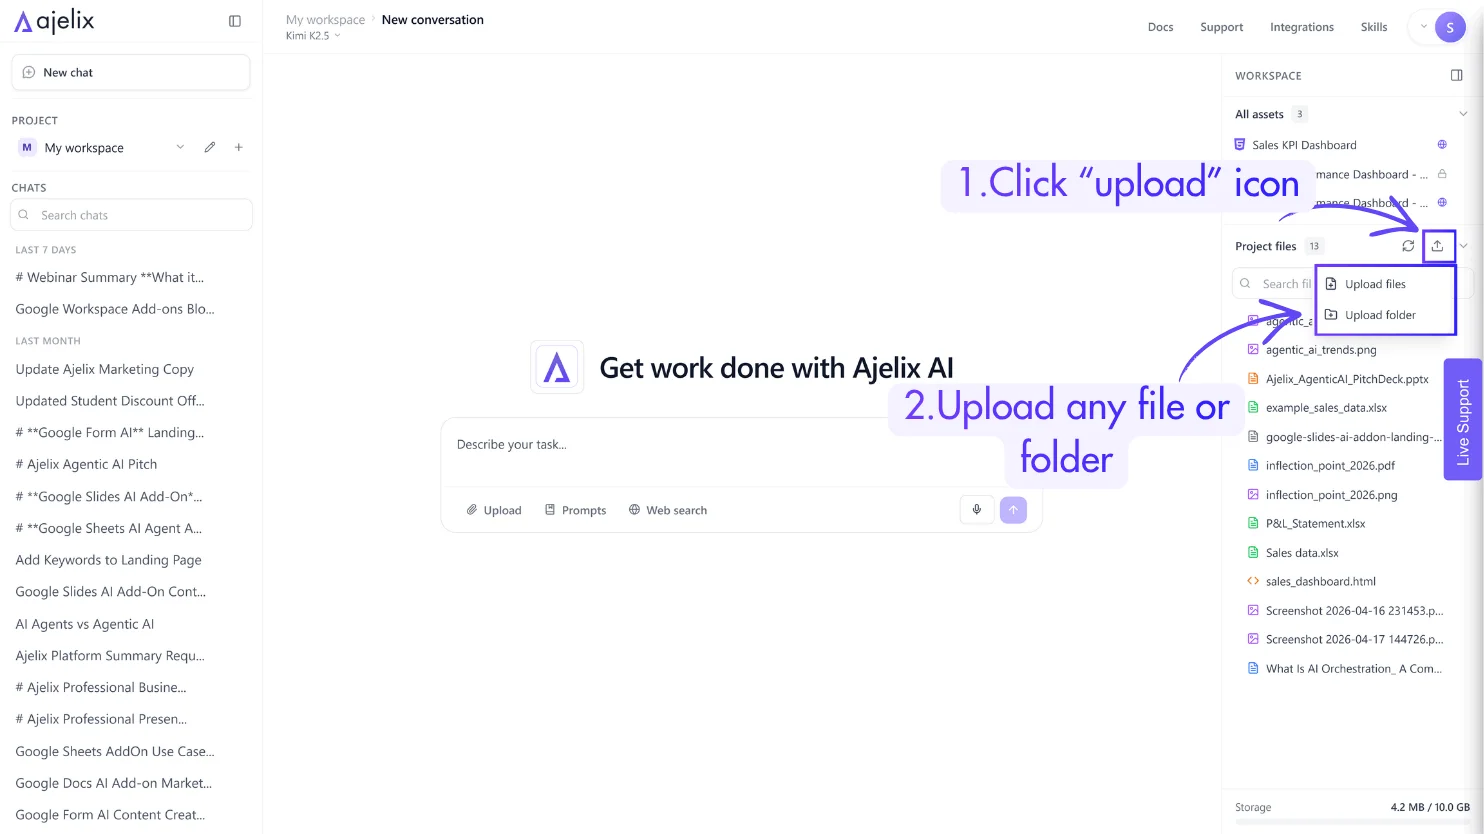
1. On the right side panel click “upload” button
2. Choose to upload file or folder
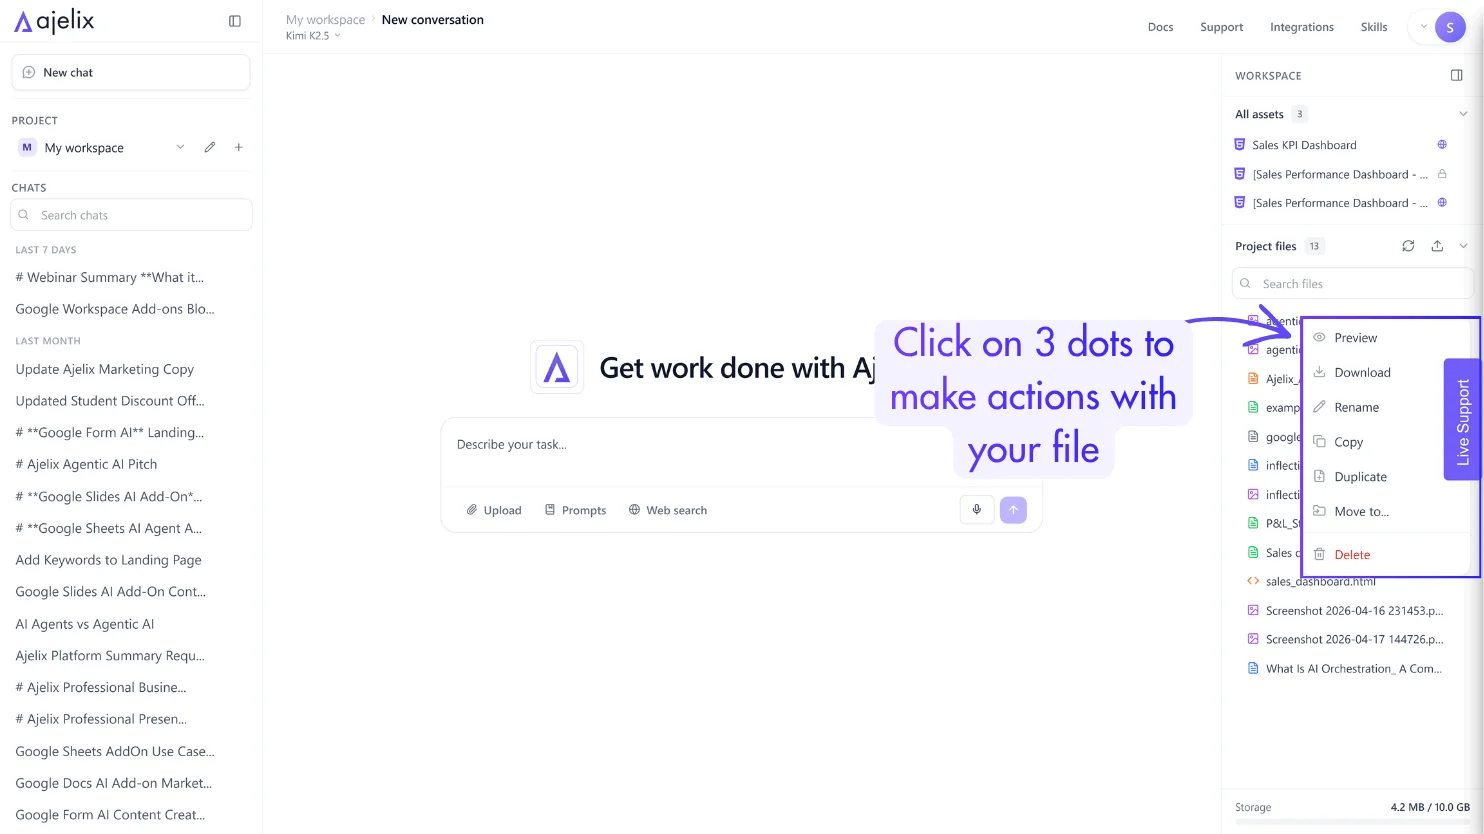
1. Click “3 dot” icon on any existing file
2. Preview, download, rename, copy, duplicate, move or delete any file.
Project Conversations
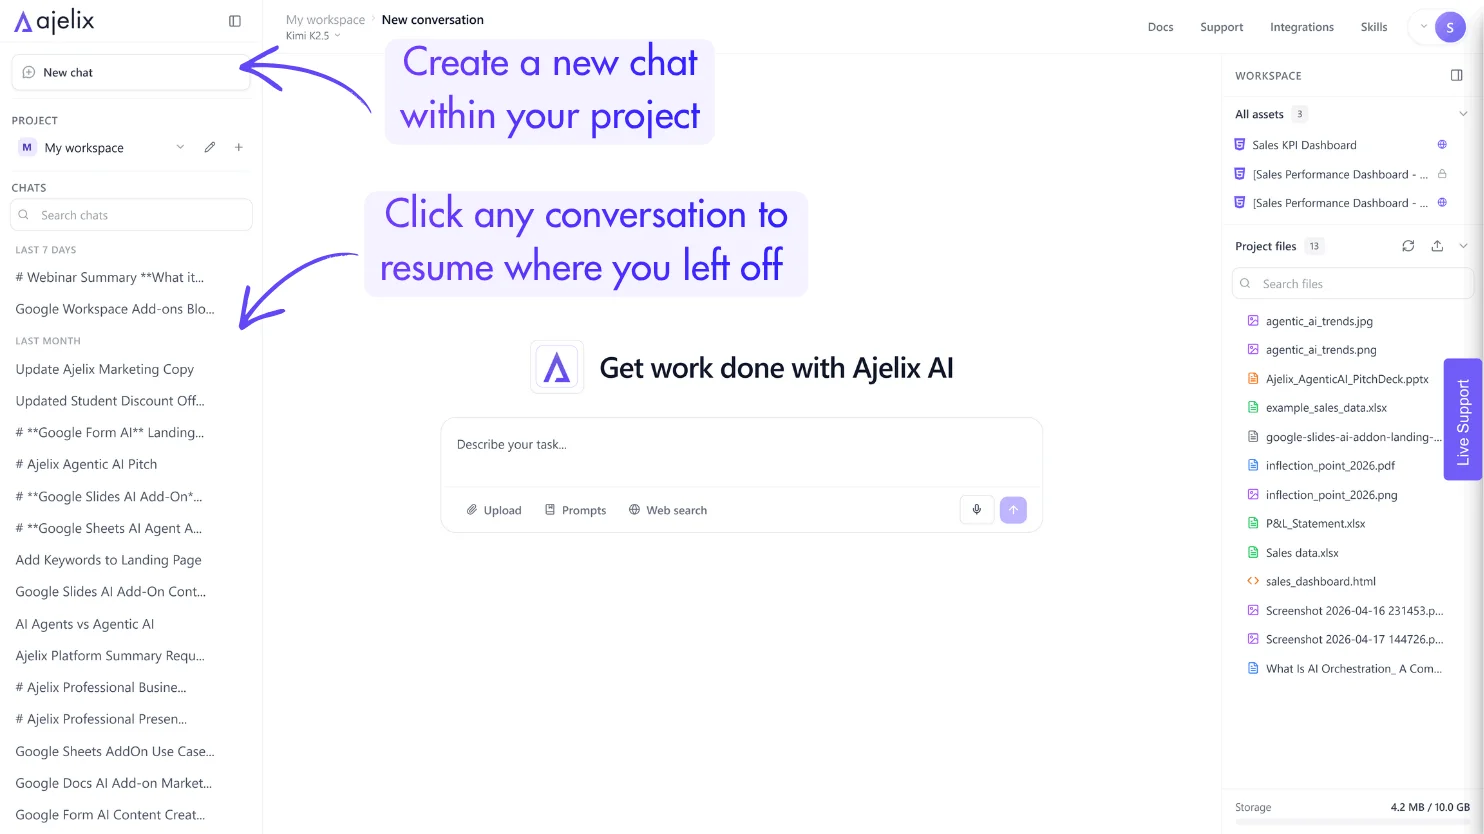
Each interaction with the AI is saved as a conversation thread:
- Conversations are organized chronologically in the sidebar
- Click any conversation to resume where you left off
- Previous context is preserved, so the AI remembers what you’ve been working on
Managing conversations:
- Start a new conversation for distinct topics or tasks
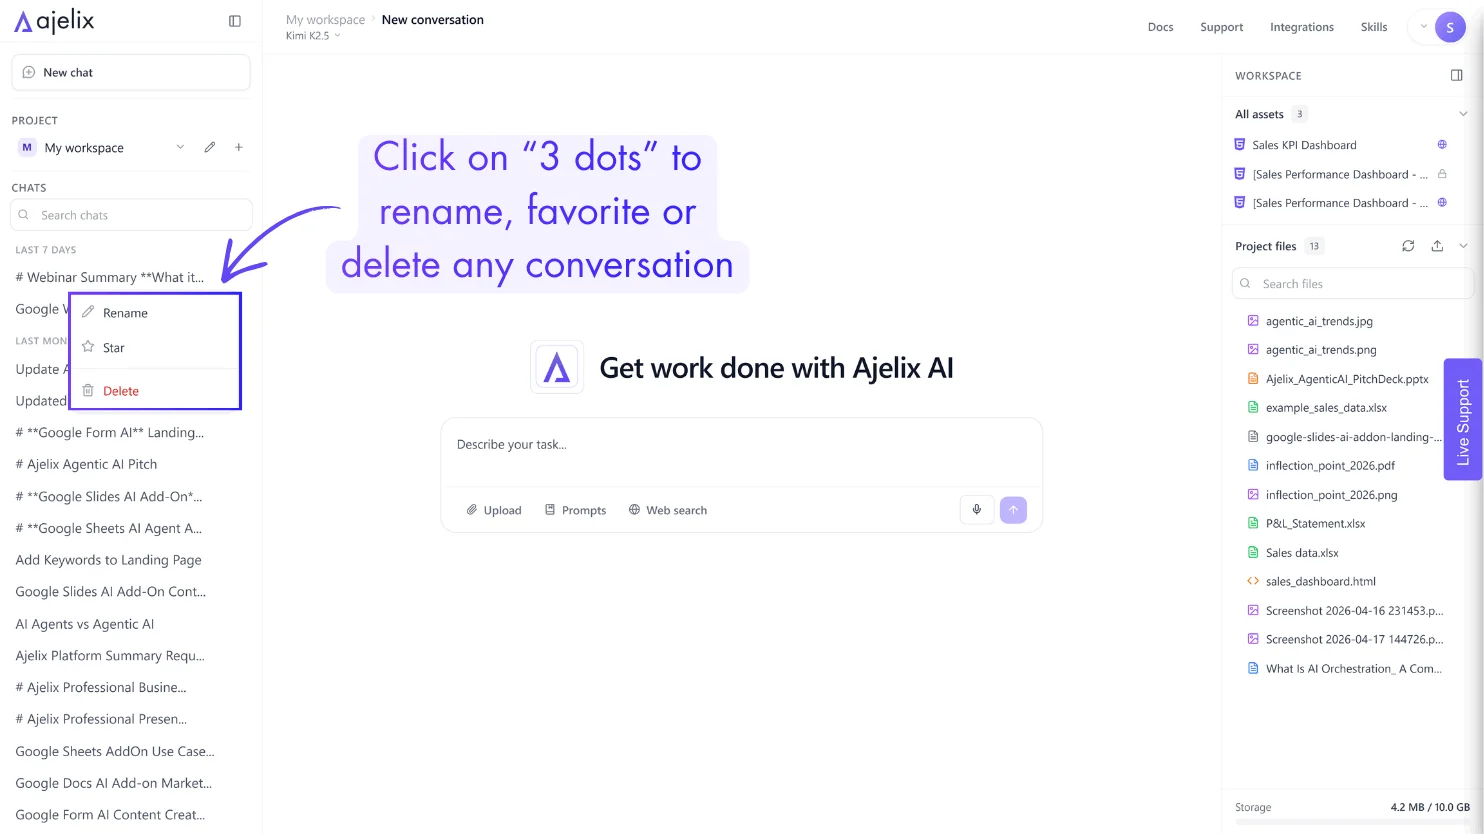
- Rename conversations by clicking the three-dot menu-useful when you have multiple threads about different aspects of the same project
- Delete old or irrelevant conversations to keep your sidebar clean
- Click the star icon to favorite conversations and keep them pinned at the top of your conversation list.
Quick Reference: Project Actions
| Action | How To |
|---|---|
| Create project | Click “+” in Projects section → Enter name&description → Create |
| Rename project | Choose project → Click “pen” icon → Make changes → Save |
| Delete project | Click “pen” icon → Delete → Confirm |
| Switch projects | Click on your current project name to switch projects |
| Upload files | Click Project Files → Upload → Select files |
| Start new conversation | Click “New chat” button on top of the left side bar |
| Rename conversation | Three-dot menu on conversation → Rename |
| Favorite conversation | Three-dot menu on conversation → Click “Star” icon |
| Delete conversation | Three-dot menu on conversation → Delete |
